Posts

Showing posts with the label MacBook

NuPhy Air 60 v2 (and the process for VIA mapping)

Image
Picked up the NuPhy Air 60 v2 , tweaked with shine-through keycaps (though oddly the set doesn’t include the right “shift” key, so I’m stuck using the old, colorway-mismatched, non-shinethrough cap for just that one key). I opted for the Moss switches , and so far I like them well enough. Anyway, I picked this up as my older Air 75 wasn’t physically compatible with my current laptops (daily drivers are a 2021 MacBook Pro 14" and an M2 Air 13.6"), and since I’ve gotten so used to HHKB layouts normally (several Tokyo 60s and a KeyChron Q60 Max, mostly), I wanted VIA remapping capability so at least I could, e.g., swap '|\' and 'backspace' (muscle memory is a bitch).  Air60 v2 on a 2021 14" MacBook Pro I got it. I finally got it figured out by actually, you know, reading the instructions . First you have to download a JSON file from Nuphy (is it NuPhy? IDK...), then toggle the Design Tab in settings under usevia.app, then upload the JSON in the Design Tab,...

Cocoon organizers FTW

Image
I bounce between bags / a briefcase (e.g., Timbuk2 Control messenger bag or Spirit or Track II backpacks; various tomtoc bags; a black leather Kenneth Cole backpack I got as a gift a few years back). I found myself buying, or poised to buy, duplicate cables and other accessories, and then realized how silly that was. But constantly unloading/loading all the miscellany was a pain in the ass. Enter Cocoon organizers. Small Cocoon with tablet accessories I have a Cocoon CPG4BK GRID-IT!® Accessory Organizer - xSmall 7" x 5" (Black) for my tablets (an old iPad Pro 9.7 in a ZAGG Rugged Book Pro keyboard case with an Apple Pencil 1 , and an iPad 9th Generation in a protective case also with an Apple Pencil 1), that fits perfectly in the front pocket of my tomtoc 11 inch Tablet Sleeve Bag . It’s carrying: An Anker 20,000 mAh battery pack Zendure X5 ( waiting on a warranty replacement ) 15,000 mAh power bank with 45W output power Insignia Lightning Wired Earbud Headphones (...

Zendure X5 Charging MacBook (USB-C)

Image
Following up from the lackluster results I got with the Anker PowerCore Fusion 10000 , I tried again with a Zendure X5 Portable Charger (still using the Anker cable). I topped it off overnight using the PowerCore Fusion, and did a quick instrumented test with the early-2015 MacBook 12" Retina. Success! Zenure X5 charging MacBook (measured by Klein ET920) I had high hopes for this power pack, since it advertises “USB-C: 5V/3A, 9V/3A, 12V/3A, 15V/3A, 20V/2.25A, 45W Max.” Sure enough, connected to the MacBook they negotiate (according to the Klein ) 20.02V at 1.38A (a little better than what I expected), which my calculator says is 27.7W and the MacBook reports as 30W. coconutBattery shows the MacBook charging at 1.4-10W depending on what the computer is doing (in regular use on battery only, it typically shows 8-10W discharge). This is acceptable. MacBook % system_profiler SPPowerDataType     ...     AC Charger Information:       C...

Anker PowerCore Fusion 10000 with an Early 2015 MacBook 12" Retina

Image
Klein measuring MacBook charging from Anker battery I picked up a cheap “early 2015” MacBook 12" . It came with a 29W USB-C charger that, according to a Klein ET920 , is currently pumping out around 14.67V at 1.87A ( the specs say either 5.2V2.4A or 14.5V2.0A; nothing’s perfect). The internal battery is degraded a bit, as you’d expect from a 7 year old set of cells with hundreds of cycles. Current capacity, according to coconutBattery, is about 4200 mAh @ 7.55 V, or 31.7 Wh ( (mAh)*(V)/1000 = (Wh) ). I thought the PowerCore Fusion 10000 would be a great on the go companion to the MacBook. It turns out, it’s just okay. (For this purpose. As a super-convenient charger + battery pack in one, it’s a great device!) On paper, at first glance, it seemed like it would fit the bill. 10,000 mAh of capacity should (even with power loss through conversion, etc) be enough to recharge a 5260 mAh MacBook battery fully, and the 20W output should be enough to allow light use and simultaneous cha...

Time Machine on a Samba or NFS server

Image
Want to back up my MacBook Air to the NAS, which is running NFS and Samba. The existing guides I found weren’t complete. I ham-fisted my way to a solution that seems to be working. This is on High Sierra, the most recent operating system this old laptop will officially run. (Since verified to also work as far back as Lion.) I skipped using the graphical Disk Utility to setup the sparsebundle, and created it from the command line (in this case, 300GB to back up a 240GB internal SSD): $ sudo hdiutil create -size 300g -type SPARSEBUNDLE \ -nospotlight -volname " MBA2012TM " -fs "Case-sensitive Journaled HFS+" \ -verbose /Volumes/ nas / Time\ Machine / MacBook-Air-2012_TM .sparsebundle Then I mounted the disk image: $ open  /Volumes/ nas / Time\ Machine / MacBook-Air-2012_TM .sparsebundle Then I tagged it as a Time Machine eligible drive: $ sudo tmutil setdestination -a /Volumes/ MBA2012TM / # Under 10.7, omit the '-a' And then went into the Time Machine cont...

Getting Bluetooth 4.0 Working on an Old MacBook

Image
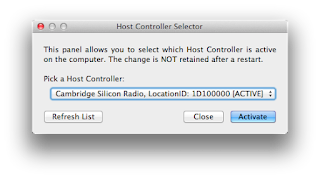
Okay, so, I have this working - not 100% seamlessly and not quite as it should, but it does work. I had do download Bluetooth Explorer for Mac OS 10.7 (linked from the Hideez documentation ), and go into Utilities → HCI Controller Selection and manually specify the Cambridge Radio device: Once that was done, I could go into the Bluetooth Setup Assistant and pair the Air 75 with the MacBook as normal (hold down Fn-1, Fn-2, or Fn-3 to select a Bluetooth profile; the left side light will blink blue when the keyboard is ready to connect, and the blinking will be faster when it’s ready to pair). A stumbling block: I’ve punched in the below terminal command multiple times and the switch to the USB Bluetooth adapter never “sticks” across reboots. Option-clicking the Bluetooth menu item shows the address 00-1B-63-47-6A-4D, which comes up as an Apple device when I search . After I switch using Bluetooth Explorer, it lists 00-1A-7D-DA-71-03, which shows up as “cyber-blue(HK)Ltd.” $ sudo nvram bl...

The ultimate lap desk setup.

Image
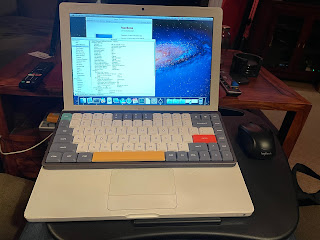
I’ve been trying to find a good “kick back on the sofa with the dogs and still get work done” solution that doesn’t kill my back, neck, etc. I think I may have found it: Any Mac laptop (or any laptop, really) with a compatible keyboard (basically, anything with the chiclet keyboard made between 2006 and, as I understand it, 2019 - I’ve used it successfully now with 2020-era Intel MacBook Air laptops, too). In this instance I’m using a Mid-2007 MacBook Core 2 Duo. NuPhy Air 75 keyboard . I’m using one with “brown” switches, via Bluetooth. It’s designed specifically to sit on top of the laptop keyboard and not interfere, and is a much nicer typing experience than the built-in keyboard, especially the ancient MacBook keyboard, which wasn’t amazing to begin with and has gotten mushy over time. (This Mac required an aftermarket Bluetooth 4.0 adapter to work with the NuPhy keyboard. It’s kind of a kludge but it worked. The bundled 2.4 GHz NuPhy dongle is another option, or you can connect i...

Dual Booting the MacBook: Linux and OS X

Image
Building on my experience getting a reasonably usable Lion install going , and finally getting Linux up and running ... I wiped the 120GB SanDisk drive and installed Lion first, partitioning the drive in two and setting the second partition up to be “free space.” I had kinda borked the install the first time around, and could not figure out why the USB installer was booting straight into the “Installing” screen and then throwing an error: “There was a problem installing ‘Mac OS X’. Try reinstalling. Rebuilding the USB installation media, and zeroing and repartitioning the hard drive, had no effect. Turns out I needed to zap the PRAM (start up the machine holding down Command-Option-R-P). I then installed Lubuntu in the unused space, with a 200MB /boot/efi FAT32 partition (with the “boot” flag set), and a 1GB swap partition. Everything seems to work great, I can boot between the operating systems by holding down the “Option” key at startup. Best of both worlds. I get the...

Getting Linux installed on an ancient MacBook

Image
The Centon "Diamond Series VS1" 60GB SSD I tossed in my old MacBook about 6 years ago died suddenly and without warning. I happened to have a SanDisk 120GB drive I recently took out of a small server floating around, so I finally got around to getting Linux installed on this thing. (Typing this on it now.) I've tried doing this before and always gave up. I wasn't sure if I had a USB drive that was compatible, etc. The key is patience. A lot of patience. I started off with one of the Matt Gadient ISO images (specifically lubuntu-20.04.1-desktop-amd64-mac-mattgadient.com.iso), and followed the instructions found on Stefan's page . I used a 2GB partition on a cheap 16GB USB flash drive I had within arm's reach (it identifies itself as vendor_id abcd, product_id 1234, product "UDisk" manufacturer "General" ...). When I booted the MacBook with the USB drive inserted, I smashed and held the Alt/Option key immediately after I hit the power button...