Posts

Showing posts with the label HHKB

Remapping the Q60, repotting the Jade

Image
Today was too hot to sit inside, and I was too fried to bike to the office, so I setup on the balcony. Balcony workstation: MacBook Pro, MOFT Z stand, Q60 keyboard, etc. The setup: MacBook Pro 14" M1 Pro resting atop a MOFT Z Invisible Thin Sit-Stand Desk to bring it up to eye level. Keychron Q60 Max keyboard (the only wireless HHKB layout board I have); Gateron Jupiter Banana switches ( 59±10 gf tactile switches with 2.0±0.6 mm pretravel, 3.4 mm max total travel, with a “crisp bump, tactile bump at top” feel; they’re not my endgame switch, but I quite like them, especially in this keyboard). Logitech M585 Wireless Mouse, Graphite . Desk pad . Sukadar Portable Clip on Fan, 10000mAh Rechargeable Battery Operated (really like this fan!). Zendure SuperTank Pro (which appears to be discontinued; not a fan of how Zendure handled a warranty claim , so, whatever...) Sport-Brella Versa-Brella SPF 50+ Adjustable Umbrella with Universal Clamp . The combination makes for a very cozy, co...

New to me Tokyo60s

Image
Saw an ad for a black Tokyo60 on r/MechMarket . Price was right (especially with the bundled Boba switches), so I picked it up: Black Tokyo60 with acrylic diffuser, case and plate foam from MKUltra (I removed the case foam, as it was blocking the underglow LED), Poron switch pads, lubed/bandaid and holee modded Durock V2 stabilizers, and Boba U4T switches. This is a different “season” (season 3) than the boards Drop is selling now; the corners of the acrylic diffuser, for instance, aren’t as flush as my other Tokyo60 boards. Followed my own instructions for flashing it to be programmable with VIA . I picked up a set of Drop + MiTo SA Laser keycaps that were on sale last week (and to that I added the Mac modifiers). I’m not wild about the keycaps, to be honest. They’re flatter than the MT3 profile, and what I ordered (or at least what was displayed) had “ASCII” alphanumerics, what I got were keys with the Japanese markings (the Gaijin set), which make the board a lot busier than I like...

Remapping a KBDFans D60Lite with VIA

Image
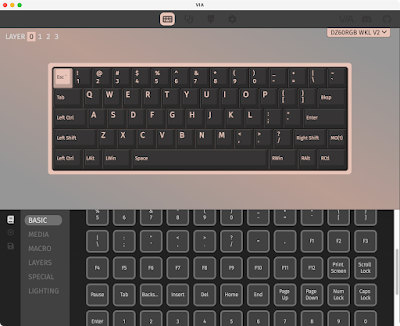
 So this took a little bit of figuring out. But I got there. Using VIA software to remap the D60Lite I first tried to flash the .hex file I built for my Tokyo60 boards , since both machines use the Mega32U4 I thought maybe ... But no:  Only firmware files in .bin format can be flashed with this bootloader! I eventually figured out how to do this (and it doesn’t involve QMK Configurator). The PCB for this kit identifies itself as a DZ60RGB WKL V2, which shows up on the list of VIA supported keyboards . A little bit of sleuthing led me to the KBDFans page for the DZ60RGB-ANSI v2 , which has a “ New Flash Manual ” that got me most of the way there. (Instead of using the dztech_dz60rgb_ansi_v2_via.bin firmware they provide, I used the dztech_dz60rgb_wkl_v2_1_via.bin file from https://www.caniusevia.com/docs/download_firmware .) Edit: A mod over at r/KBDFans suggested: “i would not recommend using the Via files from their website. Some of the files due to updates do not match up w...

HHKB Compatible Keycaps

Image
I’ve ordered this set: OEM Cherry Profile HHKB Layout Keycap | Top Printed Blank PBT Keyset | For MX Mechanical Keyboard DIY (OEM Dolch Top colorway) for $20, as a cheap way around the black-on-dark-grey Drop keycaps . I’m not smart, though; I had a moment of panic at seeing that the bottom row didn’t match, before realizing, duh, the caps are just photographed out of order and they’d mount just fine: AliExpress HHKB keycap set Other AliExpress kits I’ve found include this: HHKB Keycaps Cherry Profile PBT Material Fit Cherry MX Switches for MX Mechanical Keyboards Not for Static capacitance keyboards (7u Dye-sub Cherry)   I also have this kit coming, probably for my D60Lite board : YMDK MA Co2 Engraved Thick PBT Keycaps for HHKB Style Mechanical Keyboard Simiar to XDA Keycap Black (Black Co2 Etched) (probably the same as this ?). Not sure about the profile. I’m really digging the high profile MT3 I built the silver Tokyo60 with. I really want to find the SA Green Screen kit for ...

Programming a keyboard with QMK on a Mac

Image
I finally decided to sit down and figure out how to install a new keymap onto my Tokyo60 builds ( one , two ). Modified Layer 1 (left Layer 0 intact) with this tool: https://config.qmk.fm/#/tokyokeyboard/tokyo60/LAYOUT_60_hhkb (the QMK Configurator). I set mine up like this: Screenshot of my Layer 0 setup Screenshot of my Layer 1 setup I mapped the escape key to grave/tilde key for that tiny bit of 65% keyboard muscle memory I retain, because why not. The only other major changes I did was to add previous, next, and play/pause to Z X and C (“media stop” doesn’t seem to have any effect on a Mac), and to add more RGB controls - Hue +/- and Brightness +/-, to the RTYU keys, so I can change the solid RGB color and its brightness (I have the acrylic diffuser installed). Next, I compiled the firmware with the button in the upper-right corner of the configurator, and once compiled, downloaded it (as tokyokeyboard_tokyo60_wingedgeek1.hex ), and downloaded wingedgeek1.json , for good measure. ...

Building a Tokyo60 from Drop.com

Image
Finished Tokyo60 build Another HHKB build, because the  Drop Tokyo60 keyboard kit in the  Slate colorway was on sale. (I would have loved to have gotten Black, but it was out of stock.) Now I have a HHKB at home and at the office. I added on the acrylic diffuser panel (and picked another one up for my prior Tokyo60 build ), which Drop sells as an add-on for this kit. Drop states it “can be positioned on the bottom or between the aluminum pieces.” Screenshot: the diffuser add-on for Tokyo60 Screenshot: the diffuser can be sandwiched However, the screws that come with the kit aren’t long enough to go through both the aluminum bottom plate and the acrylic diffuser, which Joseph from Drop Community Support confirmed when I emailed them: “If you wish to use the difuser between the plates then you will need to provide the screws that are a tad longer than what comes with the kit.” Wow. Okay. These M3x10mm screws should work, but really, Drop should bundle the longer screws either...

Tokyo60 build - an MX HHKB-style keyboard (also, how to assemble stabilizers)

Image
Tokyo60 (HHKB layout) assembled. I decided to see what all the fuss was about concerning the Happy Hacking Keyboard ( discussion ), a UNIX-centric keyboard layout. $300 or so for a Topre switch board was a bit on the steep side, so instead I found ... A Coyote kit , “Used – Acceptable,” for $90 ($80 less than regular price) (wouldn’t have been my first choice for a colorway, but needs must, no?) The DROP dyesub keycaps (again, wouldn’t have been my first choice, but these were relatively cheap, already setup for a HHKB layout (albeit with “Super” instead of ♢  ⌘ for the main meta key), $46 A set of 70 DROP (by Kailh) Halo Clear switches that I thought I would like but haven’t had a chance to really put through their paces ($43). The kit arrived without the screws to mount the PCB to the case ( DROP support was less than helpful, but I found this post that sent me in the right direction, and I’m ordering some MonsterBolts - M2 x 4mm Phillips Pan Head, DIN 7985A, Alloy Steel, Bla...