Redoing my workstation (UpLift desk, Aeron chair)
Done.
I mean, it’ll probably always be a work in progress, but I’m done tweaking the space for now. Really happy with how everything came out.
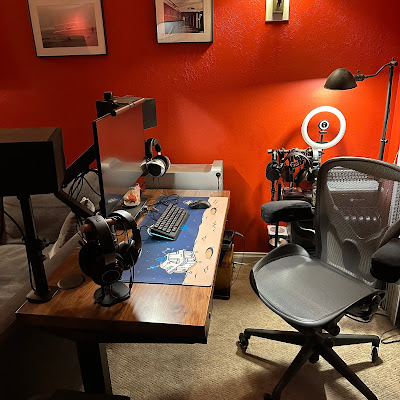 |
| The workstation corner. |
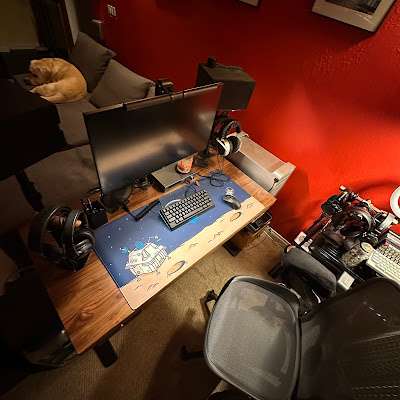 |
| The workstation corner and new sofa (featuring the Labrador) |
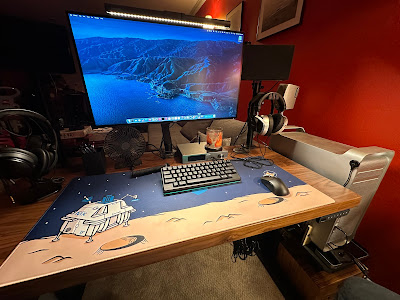 |
| The Mac Pro (etc.) battlestation itself. |
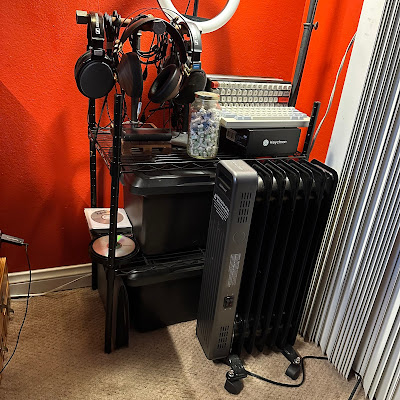 |
| The wire shelves, storage boxes, Tokyyo60 keyboards, headphones on stand, and radiator. |
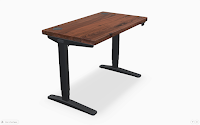
The Desk: UpLift.
 |
| UpLift Desk |
Redoing my home workstation (again), finally with a sit-stand desk (I’ve been meaning to do this for years, like, I found a Facebook post from 2014 asking for recommendations, back when my other furniture only provided a tiny space and UpLift didn’t have anything that would fit). I love my Sipo Mahogany 72x48" desk at the office (from 2016), so ...
I started with a 48x24" solid wood UpLift desk from their clearance section, with an October coupon code. Went with the regular (non-commercial) V2 C-frame in black. Added the Advanced Comfort Flush keypad (the memory feature is worth $39 to me, vs. always having to fiddle with it to get it just right). Opted for the (2) under-desk accessory hooks for my freebie, and added a compact drawer for things like the Thunderbolt 2/3 adapter. Also got the magnetic cable organizing channel, and I’m waiting on the sidecar shelf (should ship in a couple of weeks) that should hold the Mac Pro. I’m reusing the 31.5 x 15.7 inch desk pad I’ve had a few years now My old desk pad was getting kinda grungy and wasn’t fun in any way; I splurged on the Lunar Landing pad from NovelKeys. For the grommets, I’m gambling on a TOPGREENER SKU that purports to support 60W USB-C PD with GaN circuitry (which fits the 1.75" thick desk, but barely), and a Belkin BOOSTUP Wireless Charging System (B2B170), which will apparently only charge an iPhone at 7.5W, but realistically, that should be fine.
(With my long torso and overall height, I find 43.9" to be the perfect standing height (memory preset S-2), and 28" a good sitting height (S-1). If I want it to tuck in unobtrusively next to my sofa, 25.3" (S-4), and if I want to stow my Alera chair underneath with the armrests at their normal position, 31.3" (S-3).)
Update: After several days, the TOPGREENER insert continues to do everything it says. I’m using one of the USB A ports to power a Broadlink RM4 Mini Smart Remote, and the USB C PD port has charged my iPhone via an Apple Magsafe charger, and is currently - a bit surprisingly, to be honest - charging and powering the MacBook Air 11" I’m using to type this update, using the cheapie cables I gambled on a few months ago. Currently the Klein ET920 is reporting 19.51V and up to about 1.83A, for about 35W, which is about what I expect to see.
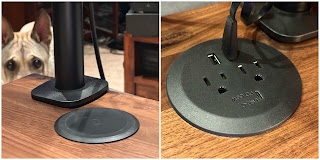 |
| Belkin BOOSTUP; TOPGREENER power center |
 |
| Grommet insert conflicting with shelf arm |
 |
| Neoprene tape wrapped around the grommet insert |
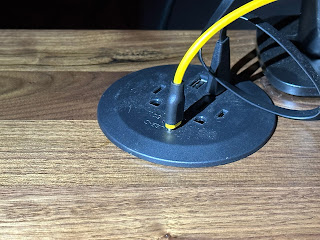 |
| Installed in the desk, a little misaligned but it is what it is |
Monitor: Dell U2717H.
I started this journey with the Dell U2417H I’d been using, but, well, I upgraded, to a U2717H (manufactured in 2018).
Monitor Arm: VIVO STAND-V101O.
The SIIG CE-MT2T12-S1 I got for the office in March for $69.99 is now $93.88, so I gambled on a $40 VIVO STAND-V101O for the monitor I was using initially (a Dell U2417H) (the VIVO claims to support up to 14.3 lbs). It’s pretty good (great for the price!), especially once I figured out I needed to crank the gas spring tension adjuster bolt counter-clockwise for my relatively lightweight (7.01 lbs) monitor. Before I figured that out, it was fine at max height, but anything lower and the screen would slowly sink to rest on the desk. (It’s now working perfectly with a slightly heavier (9.9 lbs) 27" screen. I did have to tighten the hex screw that controls tilt, but that’s no big deal.
Minor critiques: There’s not much in the line of cable management (the SIIG has a concealed channel for the lower arm, this has two plastic hoops to route cables through), and the maximum height is an inch lower than the SIIG, which with the 24" monitor - and especially the 27" I plan to upgrade to - isn’t that big of a deal.
I picked up a 10' power cord (StarTech NEMA 5-15P to C13) to go from the monitor down the arm over to the magnetic cable organizing channel and into my APC UPS. (I ran, and secured with reusable wire ties, all cables with the desk at my standing height, to make sure it could rise and lower without issue.)
Chair: Aeron Remastered.
I may drop this tempered glass chair mat down under my office chair (still using the semi-comfortable Alera 4215, watching for deals on used Aeron Bs...).Right now trying to see if it can be comfortable for Brian, who still wants to be curled up at my feet or under my chair, like, always.
Ordered another Aeron B chair from SeatingMind.com. I’d forgotten the shipping wait frustration from the last time; ordered October 28th, as of November 5th there hasn’t been any activity on the order status page. When I inquired via email they first said it would ship the week of November 20th, but the last I heard they’re going to try to get it out this week. 🤞 (Update: After a couple of emails back and forth it shipped on the 14th and FedEx says it’ll be here on the 20th.)
The “like new” chair delivered by SeatingMind.com was the old model with the wheels on the armrests (1994–2004; the one I got was built around December 2003). I wasn’t okay with paying $550 for a 20 year old chair. I returned it. My experience, chronicled.
I ended up getting one for $499 (plus a nominal delivery fee) from a seller on Facebook Marketplace that’s a 2020 Remastered Aeron, with the date sticker on the bottom intact. Much happier with that.
I shipped the tempered glass mat back (Brian’s been enjoying sprawling out in the spacious new environs under the UpLift and I don’t want to take that away from him); instead, I picked up a set of Oasis rollerblade style wheels for the Aeron.
I also added these Aloudy Ergonomic Memory Foam Office Chair Armrest Pads, $19 well spent and they fit well (and they fit the Branch Ergonomic Chair I have at another workspace like they were custom designed for that chair).
I may use this Art3d 3/4 Inch Thick Anti Fatigue Mat, especially if I put the glass mat down, but for right now at least the carpet itself seems to be fine.
The Speakers: Klipsch B-100 on WALI Stands.
I moved the Klipsch B-100 speakers up onto a pair of WALI clamp-on desktop stands, which let me put the tweeters right at ear level. Huzzah. Still running them off of a Loxjie A30 USB DAC/Amp, which continues to just work great. I upgraded to the Loxjie A40 to have a balanced output for my various headphones. I’m moving from the visible copper wires I re-used from an old home theater setup to these Mediabridge cables (SWT-06B), with integrated banana plugs (I like the black color to reduce visibility, and the cleaner look of the single thicker cable when routing). Having the speakers at the right height is awesome for the sound stage! I have them placed horizontally, though that may not be acoustically ideal (they’re basically upgraded computer speakers in this context, so, ¯\_(ツ)_/¯), as I couldn’t find stands for speakers this small and they fit the stands I did find better this way.
 |
| Klipsch B-100 speakers on Wali mounts |
Either way, they sound incredible, and really open the sound stage. Unsurprisingly, with a 4" woofer, they don't have a ton of low end, and certainly they're not quite audiophile-grade (the similar R-41Ms got skewered by at least one reviewer), but as “computer speaker replacements” they’re way, way more than adequate.
 |
| Keychron M3 Mini mouse |
Mouse: Keychron M3 Mini.
I kept getting stuttering (for lack of a better term) with the Logitech M585 mouse, and I’m evidently not the only one (and so many other threads), so I decided to try something new. Picked up the Keychron M3 Mini Wireless Optical Mouse, which can be Bluetooth but also comes with its own 2.4 GHz dongle - no pairing required, no 300MB software install required. Works great, very light weight, no hiccups. Not sure how it’s “mini,” though, it’s larger than the M585 and M535 mice I’ve been using, and fits my large hands perfectly.
Keyboard: Tokyo60s.
For the keyboard - you knew this was coming - I built up a cheap slate Tokyo 60 kit (used, from eBay) using the Keychron Double Shot Cherry PBT Keycap Full Keycap Set (219 Keys) - Royal keycaps and a bunch of Kailh Box Jade switches scavenged from one of my first “built” mechanical keyboards, the white backlight Keychron K8. (Update: I swapped out the Jades and swapped in Pale Blue switches from another board, with stiffer springs. Love 'em.) This is currently just waiting on a set of keyboard feet to be ideal.
 |
| Slate Tokyo 60 with Keychron Royal keycaps |
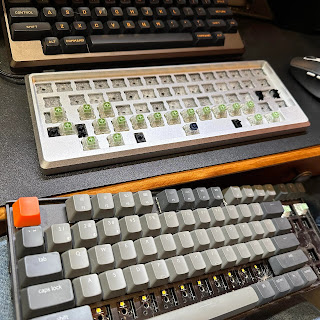 |
| Harvesting the Jade switches from a (dog) hairy Keychron K8 |
This is a somewhat temporary keyboard (while I’m waiting for the Drop + biip MT3 Extended 2048 Dark Keycap Set to ship and my orders of Kailh Box Hako Royal Clear switches and keyboard feet to arrive, so I can build a blacked out Tokyo 60 (black colorway) that’s as close to the feel of the old school Apple Extended Keyboard II as I can get...) It’ll stay in rotation, because sometimes I just want clicky. But I think the blacked-out tactile board will be my usual go-to.
Update: The Hako Royal Clear switches were lost in shipping by the Chinese carrier, and refunded. I found a cache of those switches I had left over from a project a while ago, and built up the board with those (stiffer than I remember!) and, at least for now, the cheap OEM Cherry Profile HHKB Layout - OEM Dolch Top keycaps I picked up a while ago and never used. So far, generally, liking it!
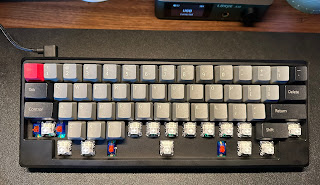 |
| Tokyo60 with Hako Royal Clear switches, RK78 stabs |
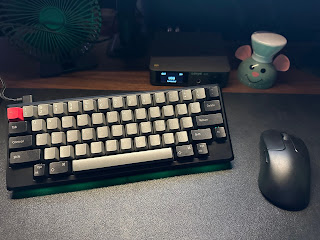 |
| Current config, Tokyo60 built, M3 Mini mouse |
Headphones: Bose QC25 (and Various Others) on Konig & Meyer Hanger.
Still using the Bose QC25 for my main work headset on this machine, with a Creative Labs Sound Blaster Live! 3 (though I’m waiting for the headphone jack to fail like it has on two other Play! 3 devices I have). The UpLift Accessory Hooks (ACC007) add-on is worthless (at least they were “free”), they require drilling, they’re cheap plastic, and they’re too small to even properly seat the relatively small headband on the Bose:
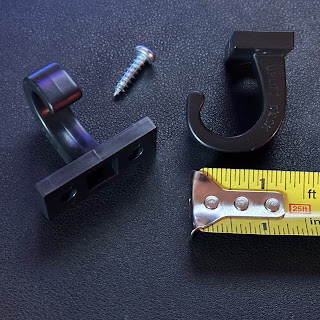 |
| UpLift Accessory Hooks |
I’m using the Konig & Meyer 16080.000.55 Headphone Clamp-On Tube Holder, which, although the product description states will clamp onto “a tube up to 1.181" diameter,” perfectly fits the 1.273" (caliper measured) top tube of the Wali speaker mounts, and has more than enough room for anything I’d hang off of it:
 |
| K&M Headphones Hanger |
Glare Reduction: Caterpillar Sunshade.
Having the matte monitor helps, but to cut down from direct sun on the screen - without having to make the whole room gloomy by closing the vertical blinds - I’m trying out this $12 potential solution: Caterpillar Retractable Pull-Down Roller Sunshade (CAAS-030). Stay tuned. (Update: It seems to work fairly well! Once I got it to stick. It really needs a squeaky clean surface.)
Power
Power Strips
Tucked into the cable management tray under the desk (the base one the UpLift desk ships with, stock), I have a CyberPower CSP604U. It has a pair of USB-A ports feeding another, this time blacked out, SLENPET 6" USB fan like the one that’s still serving me ably at the office, quietly moving a decent amount of air), and a Colorpanda Monitor Light Bar (so far my favorite of the several of these I’ve picked up (the other two from LOFTER),
in that the controls are on the light itself and you don’t have to go
digging around to find them on a cord somewhere). Plugged into the AC
outlets are the power supply for the Loxjie A30 DAC/Amp, 1x 5-15P to 2x C13 cable feeding the A40 and Jotunheim, an Anker 335 Charger for the watch/phone charger and a small illuminated noteboard, and the
extension cable that feeds the wall wart that feeds the Belkin wireless
charger.
I added an Eden Grove 3-in-1 Natural Wood Wireless MagSafe Compatible Magnetic Charger Stand that looks gorgeous and purports to be a 15W charger for the iPhone, but even connected to a 30W USB-C PD supply, it only draws about 11W so I find that claim dubious. But it’s handsome and convenient.
Powering that (to save outlets) is an Anker 335 Charger that helpfully came with a USB-C to USB-C cable (connected to the Eden Grove unit), and supplies:
- Using one port:
- USB-C1/C2: 5V⎓3A/9V⎓3A/12V⎓3A/15V⎓20V⎓3.35A (67W max)
- USB-A: 4.5V⎓5A/5V⎓4.5A/5V⎓3A/9V⎓2A/12V⎓1.5A (22.5W max)
- Using 2 ports:
- USB-C1+USB-C2: 67W Max
- USB-C1+USB-A: 67W Max
- USB-C2+USBA: 24W Max
- Using 3 ports:
- USB-C1+USB-C2+USB-A: 66W Max
- Total Output: 67W Max
- Supports PPS
- Average active efficiency: 83.91%
- Efficiency at low load (10%): 69.30%
- No load power consumption: 0.209W
Uninterruptible Power Supply (UPS)
Cables
Once the shelf finally arrived and I could finalize the placement of the various components, I realized I didn’t like the look of white/grey cables. With black cables, they sort of fade into the shadows in the corner and don’t draw attention to themselves.
- Ethernet. I swapped in inexpensive black Ethernet cables (5', 7').
- Thunderbolt. In place of Apple’s white cable, I added a black Thunderbolt 2 cable for the OWC dock.
- DC Extension Cables. The KVM uses a 5.5x2.1mm DC power cable, and the wall wart is rated for 5V 2A output. To clean things up I extended that cable with one of these extension cables. The OWC Thunderbolt 2 dock uses a 5.5x2.5mm jack and, complicating things, the power brick is rated 12V at 6A, while most extension cables state they’ll only support up to 3A of power draw. Given how I’ve loaded the thing, it probably doesn’t matter, but I like to stay within spec... This cable is advertised as supporting up to 24V 10A, so, should fit the bill.
- NEMA 5-15P / NEMA 5-15R extension cable. The power strip has a 4' cable that isn’t quite long enough to run down the leg inside the magnetic channel, so to clean it up a bit I added a short 3-prong extender.
- Polarized 2 Prong extension cable. The Belkin wireless charger has its own wall wart and it doesn’t fit stably in the power strip I have in the under desk cable management rail, so I’m extending it out with a short 2 prong cable.
- wininks Computer Y Splitter Power Cord, 3FT NEMA 5-15P to 2X IEC60320 C13 Female 2 Ways Outlet AC Power Cord, to provide power to a stacked Loxjie A40 DAC/speaker amplifier and Schiit Jotunheim headphone amplifier (with DAC card)
Cable Management
I’m looking into a way to lift the Mac Pro an inch or so, with stability, but for right now I have the KVM tucked underneath and lots of cables routing through the handles on the bottom. Not ideal, but clean enough and doesn’t get in the way. (Hiccup: The 4-button “remote” control for the KVM isn’t working, and KCEVE support hopes they can get me one in a few weeks. So the rare time I switch to one of the laptops I have to slide the KVM out a bit and hit one of the buttons on the front. First world problems.)
I commissioned a custom stand from an Etsy seller, LineColorDesign (a riff on this design) to lift the Mac Pro up enough to run cables under it, and it also has a slot for a laptop alongside. Very elegant, slick solution. Here are the renders:
 |
| Render of the Mac Pro stand |
 |
| Render of the Mac Pro stand |
 |
| Render of the Mac Pro stand |
This is a work in progress, but it’s definitely usable enough for now:
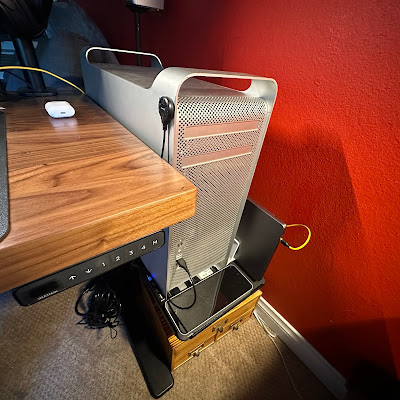 |
| Mac Pro on shelf with Thunderbolt dock in front, MacBook in stand to the side |
 | ||
| View underneath the desk, cables somewhat managed |
When I added a PowerMac G4 to the other side, I picked up a $16 VIVO Steel Magnetic 14 inch Vertical Cable Management Channel, which is noticeably cheaper than the UpLift piece on the other leg, but for $16 and the light use it’s being put to (routing a DVI to HDMI cable and a USB-A to USB-A cable to the KVM, and an 8' 3.5mm to RCA aux cable to the DAC/Amp), it’s fine.
Storage.
The little drawer from UpLift is handy, but doesn’t provide a ton of storage. After a couple of disasterous attempts at picking up a rolling toolbox with at least one drawer (both of which arrived damaged in shipping), for now at least I picked up this 3-Drawer Charred Ebony Wood Desktop Cabinet which will hold a letter sized writing pad and fits perfectly in the space under the sidecar shelf.
To the side, I’ve resigned myself currently to functional but frumpy (definitely not as cool as the tool chest would have been) set of black wire shelves I already had (alas, one of the shelves currently has several network and TV devices wire-tied to it to keep them organized and out of sight / out of the way; maybe I should do something more permanent there?). Those are holding a couple of inexpensive 7gal Small Latching Storage Totes I picked up at Target, which do a good job of eliminating clutter. Up top, I’m going to have the 3-headphone stand, hopefully some way of displaying whichever Tokyo 60 boards not currently in use, and ...?
Update: During an IKEA run to try out the POÄNG arm chair (liked it, bought it, with the Skiftebo grey cushion), I finally picked up the SKÅDIS Pegboard I’ve been contemplating for a while, for keyboard storage / display. I got the Pegboard, white, 14 ¼x22" ($17) and Connector, white ($6) (would have gotten the Free-standing peg board, white, 22x14 ½ " but didn’t see it there), and a Container, white ($4) (to hold containers of keyboard lube, keycap and switch puller tools, a switch opener...). I have it anchored to a piece of scrap wood I had and it’s perfect. Ordered some Ikea Skadis/Uppspel Keyboard Holder kits and, assuming they work, my setup will finally be complete as envisioned originally.
Update: They worked. 😀
Climate.
SLENPET 6 inch USB Desk Fan ($18, quiet, moves air, even the lowest setting is sometimes even a bit too strong). COSTWAY Oil Filled Radiator Heater 1500W ($73, almost completely silent, raises the temperature nicely to combat the chill that can seep in from the huge single pane glass wall behind me). (Never heard of COSTWAY before and they seem to just slap their name on generic products, like the Costway 16'' Adjustable Oscillating Pedestal Fan Dual Blades w/Remote Control I got at Target 2 years ago for like $66 (TCIN: 84236174) fan that’s a doppelganger for, e.g., this $42 Amazon Basics model. It’s no frills stuff that so far just seems to work quietly and competently.)

Comments
Post a Comment