Posts

Showing posts with the label Tokyo60

Switch swap, backups, “new” monitor

Image
Yesterday was a lazy day. I just couldn’t motivate to do much. I think I was recovering from a multi-week sleep deficit. But I made forward progress on a couple of things: Finally figured out how to use duplicity, snap, and get automated backups of my most critical files to a UNIX-friendly cloud service. Swapped my “ home workstation clicky” board from Box Jade switches to Box Pale Blue switches I had installed in a fullsized GK705 I never use. I’m not sure why I thought the Jades (50g operating force, 60g bottom out) were the second-stiffest clicky switches in the Kailh Box line-up after the Navy switches (60g/90g), but that honor actually goes to the Pale Blues (70g/80g). And I knew that ! (The Pale Blue switches have the heavier springs and the thinner click bar, while the Jades have the thicker click bar but the lighter spring. The Jades are more tactile, while the Pale Blues are stiffer.) Really liking the Pale Blues now. (Still using a Navy for the space bar.) Ordered a “Gr...
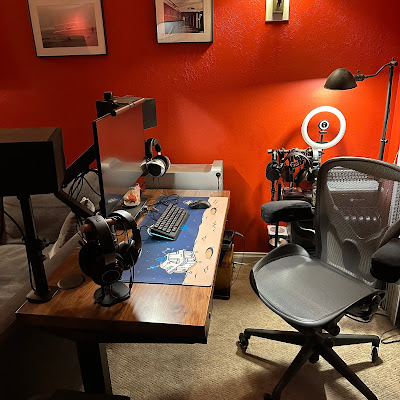
Redoing my workstation (UpLift desk, Aeron chair)

Image
Done. I mean, it’ll probably always be a work in progress, but I’m done tweaking the space for now. Really happy with how everything came out. The workstation corner. The workstation corner and new sofa (featuring the Labrador) The Mac Pro (etc.) battlestation itself. The wire shelves, storage boxes, Tokyyo60 keyboards, headphones on stand, and radiator. The Desk: UpLift. UpLift Desk Redoing my home workstation (again), finally with a sit-stand desk (I’ve been meaning to do this for years , like, I found a Facebook post from 2014 asking for recommendations, back when my other furniture only provided a tiny space and UpLift didn’t have anything that would fit). I love my Sipo Mahogany 72x48" desk at the office (from 2016), so ... I started with a 48x24" solid wood UpLift desk from their clearance section , with an October coupon code. Went with the regular (non-commercial) V2 C-frame in black. Added the Advanced Comfort Flush keypad (the memory feature is worth $39 to me, v...

Oops I did it again (again)

Image
As much as I’ve been loving my MT3-profile, thocky tactile HHKB layout keebs, I wanted to get back to something a bit more stealthy for the office. (It’s nice to have choices!) This is the result: Tokyo60 keyboard I picked this up on eBay for about half the normal selling price, it was described as an unused kit (season 4 slate colorway) but it looked like it had been used: The rubber feet were attached, everything was unwrapped, and it came with the acrylic diffuser panel that's an optional add-on. Worse, the PCB was DOA. The seller credited me $50 back and I used that to get the π60 HSE , which works perfectly with this kit. I built it up using Krytox 205g0 on 43 Studio RX78 stabilizers (lube applied with a Glorious brush ), and the Drop DCX white-on-black keycap set (with " Mac kit " modifiers). The switches are Boba U4 65g , which I haven’t used before (I’ve used the 62s and 68s (I think?)), but so far I like them. They are, indeed, essentially silent, no one can h...

Terminal Default Theme

Image
Not sure why it took me more than 0.1 seconds to figure this out, but when in doubt, RTFM ... Had to hit the “Default” button at the bottom of the list of profiles and now whenever I open Terminal.app or (while using the application) open a new window, it opens using my super-kewl l33t theme. Terminal.app running my l33t theme   MacBook Air stand with keyboard, mouse, timer Meanwhile, I’m liking the combination of a Moft Z stand with a Tokyo60 keyboard (black colorway, with Boba U4 switches and Cyber keycaps) , Pebble mouse , and Remy's Ratatouille Adventure Kitchen Timer ‡ . The MacBook Air is a 2012 Core i5 1.8 GHz with 8GB RAM and an aftermarket 256GB SSD, with a small High Sierra partition and the rest setup with Monterey courtesy OCLP . (The power cord is a USB-C to MagSafe 1 adapter connected through the Apple MagSafe 1 to 2 converter , currently hanging off a 100W UGREEN wall wort .) (I’m killing time while watching paint dry emails sync from our hosted Exchange server (...

New to me Tokyo60s

Image
Saw an ad for a black Tokyo60 on r/MechMarket . Price was right (especially with the bundled Boba switches), so I picked it up: Black Tokyo60 with acrylic diffuser, case and plate foam from MKUltra (I removed the case foam, as it was blocking the underglow LED), Poron switch pads, lubed/bandaid and holee modded Durock V2 stabilizers, and Boba U4T switches. This is a different “season” (season 3) than the boards Drop is selling now; the corners of the acrylic diffuser, for instance, aren’t as flush as my other Tokyo60 boards. Followed my own instructions for flashing it to be programmable with VIA . I picked up a set of Drop + MiTo SA Laser keycaps that were on sale last week (and to that I added the Mac modifiers). I’m not wild about the keycaps, to be honest. They’re flatter than the MT3 profile, and what I ordered (or at least what was displayed) had “ASCII” alphanumerics, what I got were keys with the Japanese markings (the Gaijin set), which make the board a lot busier than I like...

Flashing a Tokyo60 to use VIA

Image
Following up on my remapping the Tokyo60 with QMK , and remapping the D60Lite with VIA , I found tokyokeyboard_tokyo60_via.hex on https://www.caniusevia.com/docs/download_firmware and figured I’d give VIA a try on the Tokyo60. Launched QMK Toolbox . Held down left shift + right shift + B until the toolbox software recognized it was in bootloader mode: Atmel DFU device connected: ATMEL ATm32U4DFU (03EB:2FF4:0000) Flashed the tokyokeyboard_tokyo60_via.hex file: Screenshot of QMK Toolbox flashing VIA firmware onto Tokyo60     Launched the VIA software . It identifies the Tokyo60, which was back to its original key mapping. Remapped it with my preferred assignments, leaving Layer 0 untouched and tweaking Layer 1 a bit: Screenshot of VIA software mapping Layer 1 on the Tokyo60 Here’s the VIA JSON for how I have mine mapped. (Now I have to remember to do the same for my “Coyote / Skiidata” board.) I added the space as the media play/pause key in Layer 1, stealing that idea from th...

Programming a keyboard with QMK on a Mac

Image
I finally decided to sit down and figure out how to install a new keymap onto my Tokyo60 builds ( one , two ). Modified Layer 1 (left Layer 0 intact) with this tool: https://config.qmk.fm/#/tokyokeyboard/tokyo60/LAYOUT_60_hhkb (the QMK Configurator). I set mine up like this: Screenshot of my Layer 0 setup Screenshot of my Layer 1 setup I mapped the escape key to grave/tilde key for that tiny bit of 65% keyboard muscle memory I retain, because why not. The only other major changes I did was to add previous, next, and play/pause to Z X and C (“media stop” doesn’t seem to have any effect on a Mac), and to add more RGB controls - Hue +/- and Brightness +/-, to the RTYU keys, so I can change the solid RGB color and its brightness (I have the acrylic diffuser installed). Next, I compiled the firmware with the button in the upper-right corner of the configurator, and once compiled, downloaded it (as tokyokeyboard_tokyo60_wingedgeek1.hex ), and downloaded wingedgeek1.json , for good measure. ...

Building a Tokyo60 from Drop.com

Image
Finished Tokyo60 build Another HHKB build, because the  Drop Tokyo60 keyboard kit in the  Slate colorway was on sale. (I would have loved to have gotten Black, but it was out of stock.) Now I have a HHKB at home and at the office. I added on the acrylic diffuser panel (and picked another one up for my prior Tokyo60 build ), which Drop sells as an add-on for this kit. Drop states it “can be positioned on the bottom or between the aluminum pieces.” Screenshot: the diffuser add-on for Tokyo60 Screenshot: the diffuser can be sandwiched However, the screws that come with the kit aren’t long enough to go through both the aluminum bottom plate and the acrylic diffuser, which Joseph from Drop Community Support confirmed when I emailed them: “If you wish to use the difuser between the plates then you will need to provide the screws that are a tad longer than what comes with the kit.” Wow. Okay. These M3x10mm screws should work, but really, Drop should bundle the longer screws either...